对于系统管理员来说,每天进行安全漏洞分析和软件更新是每日必需的基本活动。为了避免生产环境中的故障,对系统管理员来说选择不使用由保管理器提供的自动更新选项并执行手动更新非常常见。但是这会导致以下问题的发生:
1、系统管理员必需不断提防NVD(国际漏洞数据库)中所有新的安全漏洞等。对于系统管理员来说
2、如果在服务器上安装了大量的软件,那么监控所有的软件基本是不可能的。
3、通过执行分析来确定被漏洞影响的服务器需要付出高昂的代价。在分析过程中忽略一两个服务器是很正常的。
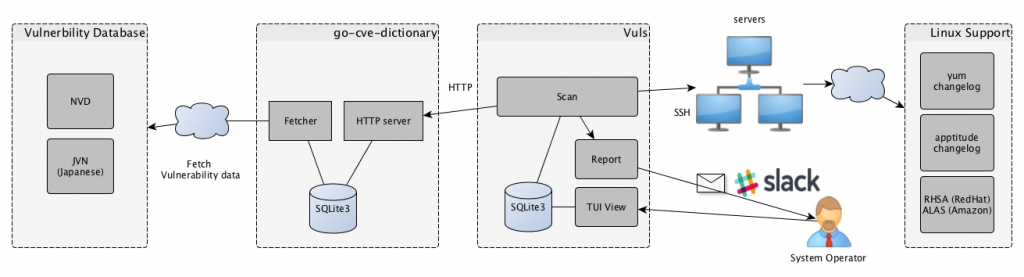
Vuls是解决以上问题的工具。它具有以下特征:
1、通知系统相关漏洞的用户。
2、通知受影响服务器的用户。
3、实现漏洞自动化检测以防止检查。
4、在使用CRON等的日常基础上生成报告来管理漏洞。
主要特点
1、在Linux服务器上扫描安全漏洞
1.1、支持Ubuntu,Debian,CentOS,Amazon Linux,RHEL ;
1.2、支持Cloud,on-premise,Docker;
2、系统包管理器中不包括扫
版权声明:本文遵循 CC 4.0 BY-SA 版权协议,若要转载请务必附上原文出处链接及本声明,谢谢合作! 描中间设备2.1、针对漏洞
版权声明:本文遵循 CC 4.0 BY-SA 版权协议,若要转载请务必附上原文出处链接及本声明,谢谢合作! 的扫描中间设备、程序语言库和框架;2.2、在CPE中注册支持软件;
3、无代理架构
要求用户只在一台通过SSH连接到其他目标服务器的机
版权声明:本文遵循 CC 4.0 BY-SA 版权协议,若要转载请务必附上原文出处链接及本声明,谢谢合作! 器上进行设置;4、配置文件模版的自动生成
使用CIDR服务器设置的自动监测,生成配置文件模版;
5、支持电子邮件和Slack通知(支持日本);
6、扫描结果在附件软件、TUI 查看终端中可见。
Vuls不能做什么?
Vuls不能更新漏洞集合包;
安装golang
首先配置可访问Google server ,则参考:全局代理配置
yum -y install sqlite git gc wget gcc
wget https://storage.googleapis.com/golang/go1.10.linux-amd64.tar.gz
tar -C /usr/local -xzf go1.10.linux-amd64.tar.gz
设置go主目录和环境变量
mkdir $HOME/go
sudo sh -c 'cat << "EOF" > /etc/profile.d/goenv.sh
export GOROOT=/usr/local/go
export GOPATH=$HOME/go
export PATH=$PATH:$GOROOT/bin:$GOPATH/bin
EOF'
source /etc/profile.d/goenv.sh
创建日志目录
sudo mkdir /var/log/vuls安装go-cve-dictionary
go get github.com/kotakanbe/go-cve-dictionary
cd $GOPATH/src/github.com/kotakanbe/go-cve-dictionary
make install
安装漏洞数据库
cd $HOME
for i in `seq 2002 $(date +"%Y")`; do go-cve-dictionary fetchnvd -years $i; done
安装goval-dictionary
go get github.com/kotakanbe/goval-dictionary
cd $GOPATH/src/github.com/kotakanbe/goval-dictionary
make install
获取CentOS数据库
goval-dictionary fetch-redhat 6 7 #系统大版本号 这里改成6 7安装Vuls
go get github.com/future-architect/vuls
cd $GOPATH/src/github.com/future-architect/vuls
make install
vulsrepo 配置说明:
[root@infvie server]# more /usr/local/vulsrepo/server/vulsrepo-config.toml
[Server]
rootPath = "/usr/local/vulsrepo"
resultsPath  = "/opt/vuls/results"  #漏洞数据库与报告生成目录
serverPort  = "15000" #vulsrepo web端访问端口
整体安装完以后的目录结构如下 :
[root@infvie go]# tree -L 2
.
├── bin
│ ├── dep
│ ├── go-cve-dictionary
│ ├── go-exploitdb
│ ├── golint
│ ├── goval-dictionary
│ └── vuls
├── pkg
│ ├── dep
│ └── linux_amd64
└── src
    ├── contrib.go.opencensus.io
    ├── github.com
    ├── golang.org
    ├── google.golang.org
    ├── go.opencensus.io
    └── gopkg.in
配置ssh免密码登录
扫描时需要从扫描服务器上能通过ssh免密码登录到被扫描服务器。ssh免密码配置需要在这两台服务器上同时配置。将每台服务器各自
– 生成RSA密钥对。此步骤不需要特殊指定,按三次回车确认即可完成。
ssh-keygen -t rsa
拷贝密钥到对方服务器
cd $HOME/.ssh/
ssh-copy-id -i id_rsa.pub x.x.x.x
被扫描服务器组件安装:
yum -y install yum-utils在$HOME目录创建vuls扫描配置文件config.toml,文件内容如下:
[slack]
hookURL      = "https://hooks.slack.com/services/abc123/defghijklmnopqrstuvwxyz"
channel      = "#channel-name"
#channel      = "#{servername}"
iconEmoji    = ":ghost:"
authUser     = "username"
notifyUsers  = ["@username"]

[mail]
smtpAddr      = "smtp.gmail.com"
smtpPort      = 465
user          = "username"
password      = "password"
from          = "[email protected]"
to            = ["[email protected]"]
cc            = ["[email protected]"]
subjectPrefix = "[vuls]"

[default]
#port        = "22"
#user        = "username"
#password    = "password"
#keyPath     = "/home/username/.ssh/id_rsa"
#keyPassword = "password"

[servers]
[servers.x-x-x-x]
host = "x.x.x.x"
port = "22"
user = "root"
keyPath = "/root/.ssh/id_rsa"

[servers.y.y.y.y]
host = "y.y.y.y"
port = "22"
user = "root"
keyPath = "/root/.ssh/id_rsa"
启动go-cve-dictionary服务
go-cve-dictionary servervuls配置测试
vuls configtest -config=/$HOME/config.tomlvuls 扫描
vuls scan查看完整报告
vuls report -format-full-text  #默认WEB格式
vuls report -format-json #命令行json输出
扫描完以后的目录结构如下 :
[root@infvie results]# tree -L 2
.
├── autoscan
├── config.toml
├── cve.sqlite3
├── go-exploitdb.sqlite3
├── oval.sqlite3
├── results
│ ├── 2019-03-18T19:00:11+08:00
│ ├── 2019-03-19T08:50:19+08:00
│ ├── 2019-03-20T08:50:19+08:00
│ ├── 2019-03-21T08:50:19+08:00
│ ├── 2019-03-22T08:50:20+08:00
│ └── current -> /opt/vuls/results/results/2019-03-22T08:50:20+08:00
└── update_cve
注意:以上是root用户下启动与扫描,安全优化考虑非root用户启动与扫描;如:vulsrepo启动设置普通用户vuls-user启动,而报告生成目录results授权:
访问WEB端可见:https://vuls-report.infvie.com
Vuls拥有基于终端的用户交互来查看扫描结果
vuls tui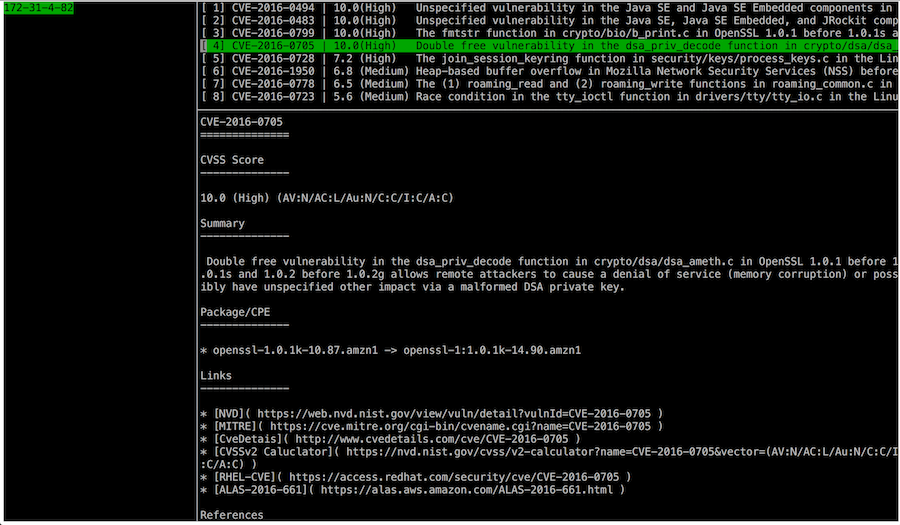
例子
在扫描前运行 go-cve-dictionary作为服务模式:
go-cve-dictionary server扫描配置文件中定义的所有服务器:
vuls scan --report-slack --report-mail --cvss-over=7使用这条样本命令可以:
1、扫描配置文件中定义的所有服务器;
2、向 slack 和 email 中发送扫描结果;
3、只报告CVSS分数超过7的CVE;
4、向终端打印扫描结果;
扫描特定的服务器
vuls scan server1 server2使用这条命令可以:
1、只扫描2个服务器(sever1,sever2);
2、向终端打印扫描结果;
扫描非系统包的漏洞
你自己监测你编译的漏洞是可能的,比如在CPE中注册的语言库盒框架等。
1、如何通过软件名搜索CPE名
NVD:搜索 Common Platform Emumerations(CPE)
检查CPE命名结构:2.2
2、配置
为检测Rails v4.2.1上的Ruby漏洞,cpeNames需要在服务器部分中被设置:
[servers]

[servers.172-31-4-82]
host         = "172.31.4.82"
user        = "ec2-user"
keyPath     = "/home/username/.ssh/id_rsa"
cpeNames = [
  "cpe:/a:rubyonrails:ruby_on_rails:4.2.1",
]
更新NVD数据
go-cve-dictionary fetchnvd -h
fetchnvd:
        fetchnvd
                [-last2y]
                [-dbpath=/path/to/cve.sqlite3]
                [-debug]
                [-debug-sql]

  -dbpath string
        /path/to/sqlite3 (default "$PWD/cve.sqlite3")
  -debug
        debug mode
  -debug-sql
        SQL debug mode
  -last2y
        Refresh NVD data in the last two years.
在整个时期fetch数据:
go-cve-dictionary fetchnvd -entire在最后两年fetch数据:
go-cve-dictionary fetchnvd -last2y参考文献
https://github.com/future-architect/vuls
https://vuls.io/docs/en/usage-report.html
https://vuls.io/docs/en/goval-dictionary.html
这个不赖,但有点怪,自己本地,还要SSH!感觉……
支持一下,顶神器~~!
很详细,有些担忧安全扫描权限过大