一、Ceph介绍
Ceph是一个可靠地、自动重均衡、自动恢复的分布式存储系统,根据场景划分可以将Ceph分为三大块
Ceph相比其它存储的优势点在于它不单单是存储,同时还充分利用了存储节点上的计算能力,在存储每一个数据时,都会通过计算得出该数据存储的位置,尽量将数据分布均衡,同时由于Ceph的良好设计,采用了CRUSH算法、HASH环等方法,使得它不存在传统的单点故障的问题,且随着规模的扩大性能并不会受到影响。
了解什么是块存储/对象存储/文件系统存储?
Ceph 目前提供对象存储(RADOSGW)、块存储RDB以及 CephFS 文件系统这 3 种功能。对于这3种功能介绍,分别如下:
对象存储,也就是通常意义的键值存储,其接口就是简单的GET、PUT、DEL 和其他扩展,代表主要有 Swift 、S3 以及 Gluster 等;
块存储,这种接口通常以 QEMU Driver 或者
文件存储,通常意义是支持 POSIX 接口,它跟传统的文件系统如 Ext4 是一个类型的,但区别在于分布式存储提供了并行化的能力,如 Ceph 的 CephFS (CephFS是Ceph面向文件存储的接口),但是有时候又会把 GlusterFS ,HDFS 这种非POSIX接口的类文件存储接口归入此类。当然 NFS、NAS也是属于文件系统存储;
1.1 Ceph架构组件

1.2 Ceph核心组件
Ceph的核心组件包括Ceph OSD、Ceph Monitor和Ceph MDS
Ceph OSD:OSD的英文全称是Object Storage Device,它的主要功能是存储数据、复制数据、平衡数据、恢复数据等,与其它OSD间进行心跳检查等,并将一些变化情况上报给Ceph Monitor。一般情况下一块硬盘对应一个OSD,由OSD来对硬盘存储进行管理,当然一个分区也可以成为一个OSD。
Ceph OSD的架构实现由物理磁盘驱动器、Linux文件系统和Ceph OSD服务组成,对于Ceph OSD Deamon而言,Linux文件系统显性的支持了其拓展性,一般Linux文件系统有好几种,比如有BTRFS、XFS、Ext4等,BTRFS虽然有很多优点特性,但现在还没达到生产环境所需的稳定性,一般比较推荐使用XFS。
伴随OSD的还有一个概念叫做Journal盘,一般写数据到Ceph集群时,都是先将数据写入到Journal盘中,然后每隔一段时间比如5秒再将Journal盘中的数据刷新到文件系统中。一般为了使读写时延更小,Journal盘都是采用SSD,一般分配10G以上,当然分配多点那是更好,Ceph中引入Journal盘的概念是因为Journal允许Ceph OSD功能很快做小的写操作;一个随机写入首先写入在上一个连续类型的journal,然后刷新到文件系统,这给了文件系统足够的时间来合并写入磁盘,一般情况下使用SSD作为OSD的journal可以有效缓冲突发负载。
Ceph Monitor:由该英文名字我们可以知道它是一个监视器,负责监视Ceph集群,维护Ceph集群的健康状态,同时维护着Ceph集群中的各种Map图,比如OSD Map、Monitor Map、PG Map和CRUSH Map,这些Map统称为Cluster Map,Cluster Map是RADOS的关键数据结构,管理集群中的所有成员、关系、属性等信息以及数据的分发,比如当用户需要存储数据到Ceph集群时,OSD需要先通过Monitor获取最新的Map图,然后根据Map图和object id等计算出数据最终存储的位置。
Ceph MDS:全称是Ceph MetaData Server,主要保存的文件系统服务的元数据,但对象存储和块存储设备是不需要使用该服务的。
查看各种Map的信息可以通过如下命令:ceph osd(mon、pg) dump
二、Ceph部署
环境规划
| ceph1 | 192.168.6.101 |
|---|---|
| ceph2 | 192.168.6.102 |
俩台机器都挂俩块盘,一块系统盘,一块osd
配置hosts:
[root@ceph1 ~]# vim /etc/hosts
192.168.6.101   ceph1
192.168.6.102   ceph2
时间同步:
ntpdate ntp1.aliyun.com设置SSH免密登录:
在ceph1上执行
ssh-keygen
ssh-copy-id ceph1
ssh-copy-id ceph2
配置主机名:
hostnamectl set-hostname ceph1
hostnamectl set-hostname ceph2
2.1 配置ceph.repo
[root@ceph1 ~]# vim /etc/yum.repos.d/ceph.repo
[ceph]
name=Ceph packages for $basearch
baseurl=http://mirrors.aliyun.com/ceph/rpm-luminous/el7/$basearch
enabled=1
gpgcheck=1
priority=1
type=rpm-md
gpgkey=https://mirrors.aliyun.com/ceph/keys/release.asc

[ceph-noarch]
name=Ceph noarch packages
baseurl=http://mirrors.aliyun.com/ceph/rpm-luminous/el7/noarch
enabled=1
gpgcheck=1
priority=1
type=rpm-md
gpgkey=https://mirrors.aliyun.com/ceph/keys/release.asc

[ceph-source]
name=Ceph source packages
baseurl=http://mirrors.aliyun.com/ceph/rpm-luminous/el7/SRPMS
enabled=0
gpgcheck=1
type=rpm-md
gpgkey=https://mirrors.aliyun.com/ceph/keys/release.asc
priority=1
安装ceph-deploy:
yum install -y https://dl.fedoraproject.org/pub/epel/epel-release-latest-7.noarch.rpm
yum makecache
yum update -y
yum install -y ceph-deploy python-setuptools
创建一个 Ceph 存储集群,它有一个 Monitor 和两个 OSD 守护进程
mkdir /etc/ceph && cd /etc/ceph
ceph-deploy new ceph1
在ceph.conf中追加以下内容
# 存储集群副本个数
osd_pool_default_size = 2
管理节点和osd节点都需要安装ceph 集群:
ceph-deploy install ceph1 ceph2配置MON初始化:
ceph-deploy mon create-initial查看ceph集群状态:
[root@ceph1 ceph]# ceph -s
  cluster:
    id:     cde3244e-89e0-4630-84d5-bf08c0e33b24
    health: HEALTH_OK

  services:
    mon: 1 daemons, quorum ceph1
    mgr: no daemons active
    osd: 0 osds: 0 up, 0 in

  data:
    pools:   0 pools, 0 pgs
    objects: 0 objects, 0B
    usage:   0B used, 0B / 0B avail
    pgs:
2.2 开启监控模块
ceph-deploy mgr create ceph1在/etc/ceph/ceph.conf中添加
[mgr]
mgr modules = dashboard
查看集群支持的模块
[root@ceph1 ceph]# ceph mgr dump
[root@ceph1 ceph]# ceph mgr module enable dashboard #启用dashboard模块
[root@ceph1 ceph]# ceph mgr dump
{
"epoch": 3,
"active_gid": 4110,
"active_name": "ceph1",
"active_addr": "192.168.6.101:6800/6619",
"available": true,
"standbys": [],
"modules": [ "balancer",
"restful",
"status"
],
"available_modules": [ "balancer",
"dashboard",
"influx",
"localpool",
"prometheus",
"restful",
"selftest",
"status",
"zabbix"
],
"services": {}
}
[root@ceph1 ceph]# ceph mgr module enable dashboard
[root@ceph1 ceph]# ceph mgr dump
{
"epoch": 6,
"active_gid": 4114,
"active_name": "ceph1",
"active_addr": "192.168.6.101:6800/6619",
"available": true,
"standbys": [],
"modules": [ "balancer",
"dashboard",
"restful",
"status"
],
"available_modules": [ "balancer",
"dashboard",
"influx",
"localpool",
"prometheus",
"restful",
"selftest",
"status",
"zabbix"
],
"services": {}
}
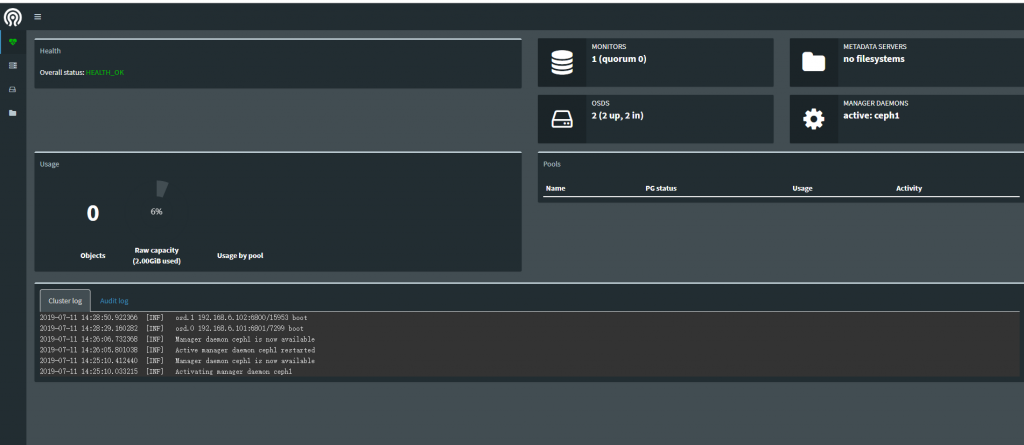
[root@ceph1 ceph]# ceph -s
cluster:
id: cde3244e-89e0-4630-84d5-bf08c0e33b24
health: HEALTH_OK
services:
mon: 1 daemons, quorum ceph1
mgr: ceph1(active)
osd: 2 osds: 2 up, 2 in
data:
pools: 0 pools, 0 pgs
objects: 0 objects, 0B
usage: 2.00GiB used, 30.0GiB / 32.0GiB avail
pgs:
2.3 配置dashboard
[root@ceph-node1 ceph]# ceph config-key put mgr/dashboard/server_addr 192.168.6.101
set mgr/dashboard/server_addr
[root@ceph-node1 ceph]# ceph config-key put mgr/dashboard/server_port 7000
set mgr/dashboard/server_port
[root@ceph1 ~]# netstat -tulnp |grep 7000
tcp        0      0 192.168.6.101:7000      0.0.0.0:*               LISTEN      19836/ceph-mgr
2.4 创建osd
删除磁盘数据
[root@ceph1 ceph]# ceph-deploy disk zap ceph1 /dev/sdb
[root@ceph1 ceph]# ceph-deploy disk zap ceph2 /dev/sdb
创建osd(一共俩个)
[root@ceph1 ceph]# ceph-deploy osd create ceph1 --data /dev/sdb
[root@ceph1 ceph]# ceph-deploy osd create ceph2 --data /dev/sdb
ceph秘钥拷贝(主节点执行)及修改密钥权限
用 ceph-deploy 把配置文件和 admin 密钥拷贝到管理节点和 Ceph 节点,这样你每次执行 Ceph 命令行时就无需指定 monitor 地址和 ceph.client.admin.keyring 了
[root@ceph1 ceph]# ceph-deploy admin ceph1 ceph2修改密钥权限(所有节点上执行)
[root@ceph1 ceph] # chmod +r /etc/ceph/ceph.client.admin.keyring
[root@ceph2] # chmod +r /etc/ceph/ceph.client.admin.keyring
访问192.168.6.101:7000
三、Ceph对象存储
3.1 Ceph RGW简介
Ceph RGW(即RADOS Gate
3.2 RGW 部署
[root@ceph1 ceph]# ceph-deploy install --rgw ceph1
[ceph_deploy.conf][DEBUG ] found configuration file at: /root/.cephdeploy.conf
[ceph_deploy.cli][INFO  ] Invoked (2.0.1): /usr/bin/ceph-deploy install --rgw ceph1
[ceph_deploy.cli][INFO  ] ceph-deploy options:
[ceph_deploy.cli][INFO  ]  verbose                       : False
[ceph_deploy.cli][INFO  ]  testing                       : None
[ceph_deploy.cli][INFO  ]  cd_conf                       : <ceph_deploy.conf.cephdeploy.Conf instance at 0x7fa3faca5e60>
[ceph_deploy.cli][INFO  ]  cluster                       : ceph
[ceph_deploy.cli][INFO  ]  dev_commit                    : None
[ceph_deploy.cli][INFO  ]  install_mds                   : False
[ceph_deploy.cli][INFO  ]  stable                        : None
[ceph_deploy.cli][INFO  ]  default_release               : False
[ceph_deploy.cli][INFO  ]  username                      : None
[ceph_deploy.cli][INFO  ]  adjust_repos                  : True
[ceph_deploy.cli][INFO  ]  func                          : <function install at 0x7fa3fbb955f0>
[ceph_deploy.cli][INFO  ]  install_mgr                   : False
[ceph_deploy.cli][INFO  ]  install_all                   : False
[ceph_deploy.cli][INFO  ]  repo                          : False
[ceph_deploy.cli][INFO  ]  host                          : ['ceph1']
[ceph_deploy.cli][INFO  ]  install_rgw                   : True
将配置文件、密钥文件同步到 ceph1:
[root@ceph1 ceph]# ceph-deploy admin ceph1
[ceph_deploy.conf][DEBUG ] found configuration file at: /root/.cephdeploy.conf
[ceph_deploy.cli][INFO  ] Invoked (2.0.1): /usr/bin/ceph-deploy admin ceph1
[ceph_deploy.cli][INFO  ] ceph-deploy options:
[ceph_deploy.cli][INFO  ]  username                      : None
[ceph_deploy.cli][INFO  ]  verbose                       : False
[ceph_deploy.cli][INFO  ]  overwrite_conf                : False
[ceph_deploy.cli][INFO  ]  quiet                         : False
[ceph_deploy.cli][INFO  ]  cd_conf                       : <ceph_deploy.conf.cephdeploy.Conf instance at 0x7fe0e152d3b0>
[ceph_deploy.cli][INFO  ]  cluster                       : ceph
[ceph_deploy.cli][INFO  ]  client                        : ['ceph1']
[ceph_deploy.cli][INFO  ]  func                          : <function admin at 0x7fe0e1dc0230>
[ceph_deploy.cli][INFO  ]  ceph_conf                     : None
[ceph_deploy.cli][INFO  ]  default_release               : False
[ceph_deploy.admin][DEBUG ] Pushing admin keys and conf to ceph1
[ceph1][DEBUG ] connected to host: ceph1
[ceph1][DEBUG ] detect platform information from remote host
[ceph1][DEBUG ] detect machine type
[ceph1][DEBUG ] write cluster configuration to /etc/ceph/{cluster}.conf
启动一个RGW服务 :
先将ceph.conf加一个参数配置
[root@ceph1 ceph]# vim ceph.conf
[global]
fsid = cde3244e-89e0-4630-84d5-bf08c0e33b24
mon_initial_members = ceph1
mon_host = 192.168.6.101
auth_cluster_required = cephx
auth_service_required = cephx
auth_client_required = cephx
osd_pool_default_size = 2
[mgr]
mgr modules = dashboard
[mon]
mon allow pool delete = true   ####有这个配置,生成的pool才可以被删除


[root@ceph1 ceph]#  ceph-deploy rgw create ceph1
[ceph_deploy.conf][DEBUG ] found configuration file at: /root/.cephdeploy.conf
[ceph_deploy.cli][INFO  ] Invoked (2.0.1): /usr/bin/ceph-deploy rgw create ceph1
[ceph_deploy.cli][INFO  ] ceph-deploy options:
[ceph_deploy.cli][INFO  ]  username                      : None
[ceph_deploy.cli][INFO  ]  verbose                       : False
[ceph_deploy.cli][INFO  ]  rgw                           : [('ceph1', 'rgw.ceph1')]
[ceph_deploy.cli][INFO  ]  overwrite_conf                : False
[ceph_deploy.cli][INFO  ]  subcommand                    : create
[ceph_deploy.cli][INFO  ]  quiet                         : False
[ceph_deploy.cli][INFO  ]  cd_conf                       : <ceph_deploy.conf.cephdeploy.Conf instance at 0x7fda85404ab8>
[ceph_deploy.cli][INFO  ]  cluster                       : ceph
[ceph_deploy.cli][INFO  ]  func                          : <function rgw at 0x7fda85a53050>
[ceph_deploy.cli][INFO  ]  ceph_conf                     : None
[ceph_deploy.cli][INFO  ]  default_release               : False
[ceph_deploy.rgw][DEBUG ] Deploying rgw, cluster ceph hosts ceph1:rgw.ceph1
[ceph1][DEBUG ] connected to host: ceph1
[ceph1][DEBUG ] detect platform information from remote host
[ceph1][DEBUG ] detect machine type
[ceph_deploy.rgw][INFO  ] Distro info: CentOS Linux 7.6.1810 Core
[ceph_deploy.rgw][DEBUG ] remote host will use systemd
[ceph_deploy.rgw][DEBUG ] deploying rgw bootstrap to ceph1
[ceph1][DEBUG ] write cluster configuration to /etc/ceph/{cluster}.conf
[ceph1][DEBUG ] create path recursively if it doesn't exist
[ceph1][INFO  ] Running command: ceph --cluster ceph --name client.bootstrap-rgw --keyring /var/lib/ceph/bootstrap-rgw/ceph.keyring auth get-or-create client.rgw.ceph1 osd allow rwx mon allow rw -o /var/lib/ceph/radosgw/ceph-rgw.ceph1/keyring
[ceph1][INFO  ] Running command: systemctl enable [email protected]
[ceph1][INFO  ] Running command: systemctl start [email protected]
[ceph1][INFO  ] Running command: systemctl enable ceph.target
[ceph_deploy.rgw][INFO  ] The Ceph Object Gateway (RGW) is now running on host ceph1 and default port 7480

验证:
[root@ceph1 ceph]# systemctl status [email protected]
● [email protected] - Ceph rados gateway
   Loaded: loaded (/usr/lib/systemd/system/[email protected]; enabled; vendor preset: disabled)
   Active: active (running) since Thu 2019-08-31 09:03:24 CST; 9s ago
 Main PID: 21057 (radosgw)
   CGroup: /system.slice/system-ceph\x2dradosgw.slice/[email protected]
           └─21057 /usr/bin/radosgw -f --cluster ceph --name client.rgw.ceph1 --setuser ceph --setgroup ceph

Jul 11 09:03:24 ceph1 systemd[1]: Started Ceph rados gateway.
[root@ceph1 ceph]# ceph -s
cluster:
id: cde3244e-89e0-4630-84d5-bf08c0e33b24
health: HEALTH_OK
services:
mon: 1 daemons, quorum ceph1
mgr: ceph1(active)
osd: 2 osds: 2 up, 2 in
rgw: 1 daemon active
data:
pools: 4 pools, 32 pgs
objects: 187 objects, 1.09KiB
usage: 2.01GiB used, 30.0GiB / 32.0GiB avail
pgs: 32 active+clean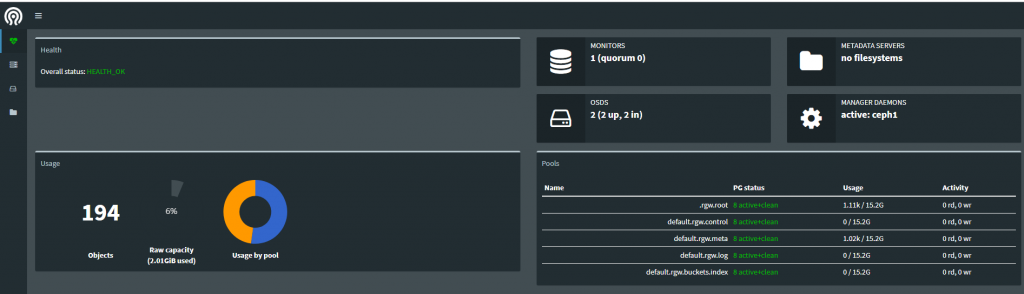
3.3 s3 用户管理
创建用户 :
[root@ceph1 ceph]# radosgw-admin user create --uid="radosgw" --display-name="First User"
{
    "user_id": "radosgw",
    "display_name": "First User",
    "email": "",
    "suspended": 0,
    "max_buckets": 1000,
    "auid": 0,
    "subusers": [],
    "keys": [
        {
            "user": "radosgw",
            "access_key": "CQE7E6ZDVA74KVJ0077A",
            "secret_key": "wnRy76RM2s85ozWvKwTBezrBU0RwcCTQJf1HFAM8"
        }
    ],
    "swift_keys": [],
    "caps": [],
    "op_mask": "read, write, delete",
    "default_placement": "",
    "placement_tags": [],
    "bucket_quota": {
        "enabled": false,
        "check_on_raw": false,
        "max_size": -1,
        "max_size_kb": 0,
        "max_objects": -1
    },
    "user_quota": {
        "enabled": false,
        "check_on_raw": false,
        "max_size": -1,
        "max_size_kb": 0,
        "max_objects": -1
    },
    "temp_url_keys": [],
    "type": "rgw"
}
这个是后续需要的账户信息
"user": "radosgw",
            "access_key": "CQE7E6ZDVA74KVJ0077A",
            "secret_key": "wnRy76RM2s85ozWvKwTBezrBU0RwcCTQJf1HFAM8"
授权用户,允许 radosgw 读写 users 信息:
[root@ceph1 ceph]# radosgw-admin caps add --uid=radosgw --caps="users=*"
{
    "user_id": "radosgw",
    "display_name": "First User",
    "email": "",
    "suspended": 0,
    "max_buckets": 1000,
    "auid": 0,
    "subusers": [],
    "keys": [
        {
            "user": "radosgw",
            "access_key": "CQE7E6ZDVA74KVJ0077A",
            "secret_key": "wnRy76RM2s85ozWvKwTBezrBU0RwcCTQJf1HFAM8"
        }
    ],
    "swift_keys": [],
    "caps": [
        {
            "type": "users",
            "perm": "*"
        }
    ],
    "op_mask": "read, write, delete",
    "default_placement": "",
    "placement_tags": [],
    "bucket_quota": {
        "enabled": false,
        "check_on_raw": false,
        "max_size": -1,
        "max_size_kb": 0,
        "max_objects": -1
    },
    "user_quota": {
        "enabled": false,
        "check_on_raw": false,
        "max_size": -1,
        "max_size_kb": 0,
        "max_objects": -1
    },
    "temp_url_keys": [],
    "type": "rgw"
}
允许 radosgw 读写所有的usage信息:
[root@ceph1 ceph]#  radosgw-admin caps add --uid=radosgw --caps="usage=read,write"
{
    "user_id": "radosgw",
    "display_name": "First User",
    "email": "",
    "suspended": 0,
    "max_buckets": 1000,
    "auid": 0,
    "subusers": [],
    "keys": [
        {
            "user": "radosgw",
            "access_key": "CQE7E6ZDVA74KVJ0077A",
            "secret_key": "wnRy76RM2s85ozWvKwTBezrBU0RwcCTQJf1HFAM8"
        }
    ],
    "swift_keys": [],
    "caps": [
        {
            "type": "usage",
            "perm": "*"
        },
        {
            "type": "users",
            "perm": "*"
        }
    ],
    "op_mask": "read, write, delete",
    "default_placement": "",
    "placement_tags": [],
    "bucket_quota": {
        "enabled": false,
        "check_on_raw": false,
        "max_size": -1,
        "max_size_kb": 0,
        "max_objects": -1
    },
    "user_quota": {
        "enabled": false,
        "check_on_raw": false,
        "max_size": -1,
        "max_size_kb": 0,
        "max_objects": -1
    },
    "temp_url_keys": [],
    "type": "rgw"
}
创建子用户,做为后面 swift 客户端访问时使用:
[root@ceph1 ceph]#  radosgw-admin subuser create --uid=radosgw --subuser=radosgw:swift --access=full
{
    "user_id": "radosgw",
    "display_name": "First User",
    "email": "",
    "suspended": 0,
    "max_buckets": 1000,
    "auid": 0,
    "subusers": [
        {
            "id": "radosgw:swift",
            "permissions": "full-control"
        }
    ],
    "keys": [
        {
            "user": "radosgw",
            "access_key": "CQE7E6ZDVA74KVJ0077A",
            "secret_key": "wnRy76RM2s85ozWvKwTBezrBU0RwcCTQJf1HFAM8"
        }
    ],
    "swift_keys": [
        {
            "user": "radosgw:swift",
            "secret_key": "A3GDj2yjkGJahkCM6YJS4QKQlGz2zd65GXvCkiwV"
        }
    ],
    "caps": [
        {
            "type": "usage",
            "perm": "*"
        },
        {
            "type": "users",
            "perm": "*"
        }
    ],
    "op_mask": "read, write, delete",
    "default_placement": "",
    "placement_tags": [],
    "bucket_quota": {
        "enabled": false,
        "check_on_raw": false,
        "max_size": -1,
        "max_size_kb": 0,
        "max_objects": -1
    },
    "user_quota": {
        "enabled": false,
        "check_on_raw": false,
        "max_size": -1,
        "max_size_kb": 0,
        "max_objects": -1
    },
    "temp_url_keys": [],
    "type": "rgw"
}
创建密钥 :
[root@ceph1 ceph]# radosgw-admin key create --subuser=radosgw:swift --key-type=swift --gen-secret
{
    "user_id": "radosgw",
    "display_name": "First User",
    "email": "",
    "suspended": 0,
    "max_buckets": 1000,
    "auid": 0,
    "subusers": [
        {
            "id": "radosgw:swift",
            "permissions": "full-control"
        }
    ],
    "keys": [
        {
            "user": "radosgw",
            "access_key": "CQE7E6ZDVA74KVJ0077A",
            "secret_key": "wnRy76RM2s85ozWvKwTBezrBU0RwcCTQJf1HFAM8"
        }
    ],
    "swift_keys": [
        {
            "user": "radosgw:swift",
            "secret_key": "CZ2F5lqOfdmTCLSPyzqcw5pPNeetruAL4HjHkiAh"
        }
    ],
    "caps": [
        {
            "type": "usage",
            "perm": "*"
        },
        {
            "type": "users",
            "perm": "*"
        }
    ],
    "op_mask": "read, write, delete",
    "default_placement": "",
    "placement_tags": [],
    "bucket_quota": {
        "enabled": false,
        "check_on_raw": false,
        "max_size": -1,
        "max_size_kb": 0,
        "max_objects": -1
    },
    "user_quota": {
        "enabled": false,
        "check_on_raw": false,
        "max_size": -1,
        "max_size_kb": 0,
        "max_objects": -1
    },
    "temp_url_keys": [],
    "type": "rgw"
}
3.4 s3 安装与配置
[root@ceph1 ceph]# yum -y install s3cmd.noarch
[root@ceph1 ceph]# s3cmd --configure
New settings:
  Access Key: CQE7E6ZDVA74KVJ0077A
  Secret Key: wnRy76RM2s85ozWvKwTBezrBU0RwcCTQJf1HFAM8
  Default Region: US
  S3 Endpoint: 192.168.6.101:7480
  DNS-style bucket+hostname:port template for accessing a bucket: %(bucket)s.192.168.6.101:7480 bucket
  Encryption password: 123456
  Path to GPG program: /usr/bin/gpg
  Use HTTPS protocol: False
  HTTP Proxy server name:
  HTTP Proxy server port: 0

Test access with supplied credentials? [Y/n] y
Please wait, attempting to list all buckets...
Success. Your access key and secret key worked fine :-)

Now verifying that encryption works...
Success. Encryption and decryption worked fine :-)

Save settings? [y/N] y
Configuration saved to '/root/.s3cfg'
格式是这样:
Default Region [US]:                        #这里一定不要修改,否则后面会报错
S3 Endpoint [s3.amazonaws.com]: 192.168.6.101:7480
DNS-style bucket+hostname:port template for accessing a bucket [%(bucket)s.s3.amazonaws.com]: %(bucket)s.192.168.20.148:7480 bucket     #相当于百度网盘的创建文件夹,这里是固定格式
Path to GPG program [/usr/bin/gpg]:                 #保持默认
Use HTTPS protocol [Yes]: no                    #这里写 no ,因为没有提供 https 端口
HTTP Proxy server name:                       #这里不用写,因为没有代理
Test access with supplied credentials? [Y/n] y
Save settings? [y/N] y
3.5 bucket 创建
root@ceph1 ~]# s3cmd mb s3://cephdir
[root@ceph1 ~]# s3cmd put /etc/hosts s3://ceph_dir
upload: '/etc/hosts' -> 's3://ceph_dir/hosts'  [1 of 1]
 200 of 200   100% in    1s   133.14 B/s  done

 [root@ceph1 ~]# s3cmd ls s3://ceph_dir
2019-08-31 09:41       200   s3://ceph_dir/hosts
s3
[root@ceph-f ~]# yum -y install python-boto
[root@ceph-f ~]# vim s3test.py
import boto.s3.connection
access_key = 'N6ALEK0KS0ISYCIM5JBG'
secret_key = 'qK9hrpX2uwna4elPP1VsuErmAHBw3So40fE2K4yM'
conn = boto.connect_s3(
         aws_access_key_id=access_key,
         aws_secret_access_key=secret_key,
         host='ceph1', port=7480,
         is_secure=False, calling_format=boto.s3.connection.OrdinaryCallingFormat(),
         )
bucket = conn.create_bucket('xxx_yyy')
for bucket in conn.get_all_buckets():
     print "{name} {created}".format(
     name=bucket.name,
     created=bucket.creation_date,
     )
在使用时,请替换自己的 access_key、secret_key、主机名和端口
3.6 swift 接口测试
yum install python-setuptools
easy_install pip
pip install --upgrade setuptools
pip install --upgrade python-swiftclient
命令行访问 :
[root@ceph1 ~]# swift -A http://192.168.6.101:7480/auth/v1.0 -U radosgw:swift -K CZ2F5lqOfdmTCLSPyzqcw5pPNeetruAL4HjHkiAh list
ceph_dir


swift -A http://192.168.6.101:7480/auth/v1.0 -U radosgw:swift -K CZ2F5lqOfdmTCLSPyzqcw5pPNeetruAL4HjHkiAh post sy-yt

swift -A http://192.168.6.101:7480/auth/v1.0 -U radosgw:swift -K CZ2F5lqOfdmTCLSPyzqcw5pPNeetruAL4HjHkiAh post sy_yt


[root@ceph1 ~]# swift -A http://192.168.6.101:7480/auth/v1.0 -U radosgw:swift -K CZ2F5lqOfdmTCLSPyzqcw5pPNeetruAL4HjHkiAh list
ceph_dir
sy-yt
sy_yt
这里提供 swift 的测试脚本:
[root@ceph-f ~]# vim swift.py
import swiftclient
user = 'radosgw:swift'
key = 'CZ2F5lqOfdmTCLSPyzqcw5pPNeetruAL4HjHkiAh'

conn = swiftclient.Connection(
         user=user,
         key=key,
         authurl='http://192.168.6.101:7480/auth/v1.0',
         )
for container in conn.get_account()[1]:
         print container['name']
在使用时,请替换自己的 access_key、secret_key、authurl
四、Ceph集群部署
4.1 集群架构
| ceph1 | 192.168.10.186 | admin、mon、mgr、osd、rgw |
| ceph2 | 192.168.10.187 | mon、mgr、osd、rgw |
| ceph3 | 192.168.10.188 | mon、mgr、osd、rgw |
环境初始化
[root@10dot186 ~]# vim /etc/hosts
192.168.10.186   ceph1
192.168.10.187   ceph2
192.168.10.188   ceph3

hostnamectl set-hostname ceph1
hostnamectl set-hostname ceph2
hostnamectl set-hostname ceph3

ntpdate ntp1.aliyun.com


ssh-keygen
ssh-copy-id ceph1
ssh-copy-id ceph2
ssh-copy-id ceph3


[root@ceph1 ~]# vim /etc/yum.repos.d/ceph.repo
[ceph]
name=Ceph packages for $basearch
baseurl=http://mirrors.aliyun.com/ceph/rpm-luminous/el7/$basearch
enabled=1
gpgcheck=1
priority=1
type=rpm-md
gpgkey=https://mirrors.aliyun.com/ceph/keys/release.asc

[ceph-noarch]
name=Ceph noarch packages
baseurl=http://mirrors.aliyun.com/ceph/rpm-luminous/el7/noarch
enabled=1
gpgcheck=1
priority=1
type=rpm-md
gpgkey=https://mirrors.aliyun.com/ceph/keys/release.asc

[ceph-source]
name=Ceph source packages
baseurl=http://mirrors.aliyun.com/ceph/rpm-luminous/el7/SRPMS
enabled=0
gpgcheck=1
type=rpm-md
gpgkey=https://mirrors.aliyun.com/ceph/keys/release.asc
priority=1


yum install -y https://dl.fedoraproject.org/pub/epel/epel-release-latest-7.noarch.rpm
yum makecache
yum update -y
yum install -y ceph-deploy


mkdir /etc/ceph && cd /etc/ceph
ceph-deploy new ceph1  ceph2 ceph3


yum install -y python-setuptools

在配置文件中增加:
osd_pool_default_size = 3
[mgr]
mgr modules = dashboard
[mon]
mon allow pool delete = true
4.2 mon部署
ceph-deploy install ceph1 ceph2 ceph3

ceph-deploy mon create-initial


[root@ceph1 ceph]# ceph -s
  cluster:
    id:     fcb2fa5e-481a-4494-9a27-374048f37113
    health: HEALTH_OK

  services:
    mon: 3 daemons, quorum ceph1,ceph2,ceph3
    mgr: no daemons active
    osd: 0 osds: 0 up, 0 in

  data:
    pools:   0 pools, 0 pgs
    objects: 0 objects, 0B
    usage:   0B used, 0B / 0B avail
    pgs:
4.3 mgr部署
ceph-deploy mgr create ceph1 ceph2 ceph3


[root@ceph1 ceph]# ceph -s
  cluster:
    id:     fcb2fa5e-481a-4494-9a27-374048f37113
    health: HEALTH_OK

  services:
    mon: 3 daemons, quorum ceph1,ceph2,ceph3
    mgr: ceph1(active), standbys: ceph2, ceph3
    osd: 0 osds: 0 up, 0 in

  data:
    pools:   0 pools, 0 pgs
    objects: 0 objects, 0B
    usage:   0B used, 0B / 0B avail
    pgs:


[root@ceph1 ceph]# ceph mgr dump
{
    "epoch": 4,
    "active_gid": 4122,
    "active_name": "ceph1",
    "active_addr": "192.168.10.186:6800/22316",
    "available": true,
    "standbys": [
        {
            "gid": 4129,
            "name": "ceph2",
            "available_modules": [
                "balancer",
                "dashboard",
                "influx",
                "localpool",
                "prometheus",
                "restful",
                "selftest",
                "status",
                "zabbix"
            ]
        },
        {
            "gid": 4132,
            "name": "ceph3",
            "available_modules": [
                "balancer",
                "dashboard",
                "influx",
                "localpool",
                "prometheus",
                "restful",
                "selftest",
                "status",
                "zabbix"
            ]
        }
    ],
    "modules": [
        "balancer",
        "restful",
        "status"
    ],
    "available_modules": [
        "balancer",
        "dashboard",
        "influx",
        "localpool",
        "prometheus",
        "restful",
        "selftest",
        "status",
        "zabbix"
    ],
    "services": {}
}
[root@ceph1 ceph]# ceph mgr module enable dashboard
[root@ceph1 ceph]# ceph mgr dump
{
    "epoch": 7,
    "active_gid": 4139,
    "active_name": "ceph1",
    "active_addr": "192.168.10.186:6800/22316",
    "available": true,
    "standbys": [
        {
            "gid": 4136,
            "name": "ceph3",
            "available_modules": [
                "balancer",
                "dashboard",
                "influx",
                "localpool",
                "prometheus",
                "restful",
                "selftest",
                "status",
                "zabbix"
            ]
        },
        {
            "gid": 4141,
            "name": "ceph2",
            "available_modules": [
                "balancer",
                "dashboard",
                "influx",
                "localpool",
                "prometheus",
                "restful",
                "selftest",
                "status",
                "zabbix"
            ]
        }
    ],
    "modules": [
        "balancer",
        "dashboard",
        "restful",
        "status"
    ],
    "available_modules": [
        "balancer",
        "dashboard",
        "influx",
        "localpool",
        "prometheus",
        "restful",
        "selftest",
        "status",
        "zabbix"
    ],
    "services": {}
}


[root@ceph1 ceph]# ceph config-key put mgr/dashboard/server_addr 192.168.6.101
set mgr/dashboard/server_addr
[root@ceph1 ceph]# ceph config-key put mgr/dashboard/server_port 7000
set mgr/dashboard/server_port
[root@ceph1 ~]# netstat -tulnp |grep 7000
tcp        0      0 192.168.6.101:7000      0.0.0.0:*               LISTEN      19836/ceph-mgr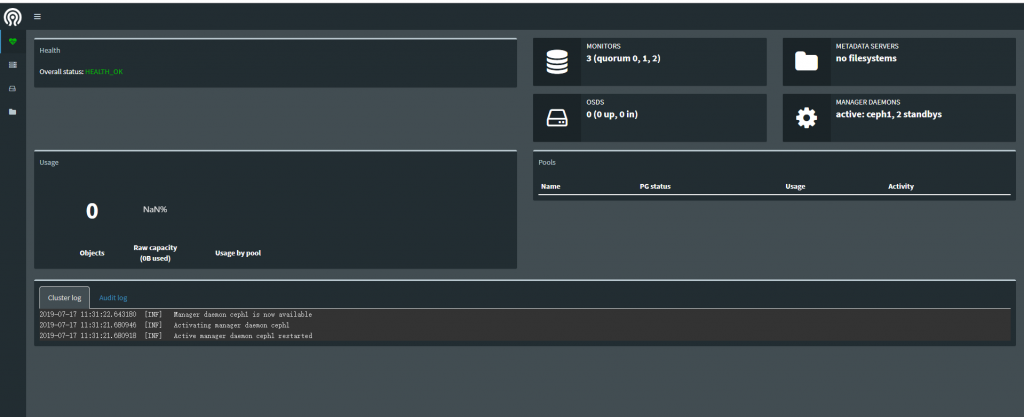
4.4 OSD部署
每台机器做逻辑卷
[root@ceph1 ceph]# pvcreate /dev/sdb
  Physical volume "/dev/sdb" successfully created.

[root@ceph1 ceph]# vgcreate data_vg1 /dev/sdb
  Volume group "data_vg1" successfully created

[root@ceph1 ceph]# lvcreate -n data_lv1 -L 99g data_vg1
  Logical volume "data_lv1" created.


ceph-deploy osd create ceph1 --data data_vg1/data_lv1
ceph-deploy osd create ceph2 --data data_vg1/data_lv1
ceph-deploy osd create ceph3 --data data_vg1/data_lv1

[root@ceph1 ceph]# ceph -s
  cluster:
    id:     fcb2fa5e-481a-4494-9a27-374048f37113
    health: HEALTH_OK

  services:
    mon: 3 daemons, quorum ceph1,ceph2,ceph3
    mgr: ceph1(active), standbys: ceph3, ceph2
    osd: 3 osds: 3 up, 3 in

  data:
    pools:   0 pools, 0 pgs
    objects: 0 objects, 0B
    usage:   3.01GiB used, 294GiB / 297GiB avail
    pgs: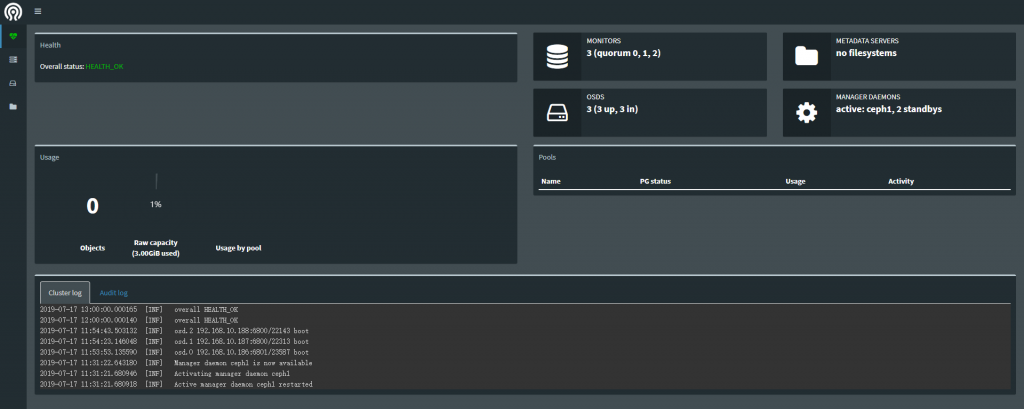
4.5 rgw部署
ceph-deploy install --rgw ceph1 ceph2 ceph3

ceph-deploy admin ceph1 ceph2 ceph3

ceph-deploy rgw create ceph1 ceph2 ceph3

[root@ceph1 ceph]# ceph -s
  cluster:
    id:     fcb2fa5e-481a-4494-9a27-374048f37113
    health: HEALTH_OK

  services:
    mon: 3 daemons, quorum ceph1,ceph2,ceph3
    mgr: ceph1(active), standbys: ceph3, ceph2
    osd: 3 osds: 3 up, 3 in
    rgw: 3 daemons active

  data:
    pools:   4 pools, 32 pgs
    objects: 191 objects, 3.08KiB
    usage:   3.01GiB used, 294GiB / 297GiB avail
    pgs:     32 active+clean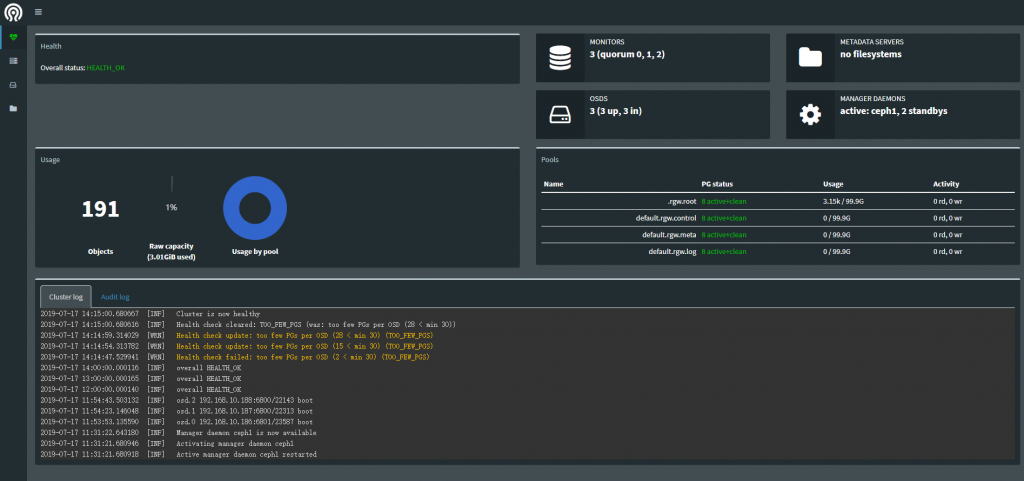
4.6 NGINX 配置代理
[root@ceph1 conf.d]# cat cephcloud.infvie.org.conf
        upstream cephcloud.infvie.org  {
        server  192.168.10.186:7480;
        server  192.168.10.187:7480;
        server  192.168.10.188:7480;
        }
        server {
        listen       80;
        server_name  cephcloud.infvie.org;
        location / {
                        proxy_intercept_errors on;
                        access_log /var/log/nginx/cephcloud_log;
                        proxy_pass http://cephcloud.infvie.org;
                        proxy_set_header X-Real-IP $remote_addr;
                        proxy_set_header Host $host;
                        proxy_set_header X-Forwarded-For $proxy_add_x_forwarded_for;
                        proxy_set_header Request_Uri $request_uri;

                }
        }
4.7 s3&swift 配置
New settings:
  Access Key: M954JYYAOBES65B7UNEZ
  Secret Key: 11MZu3N9vB4S4C4N8U2Ywgkhxro3Xi6K9HPyRQ9v
  Default Region: US
  S3 Endpoint: cephcloud.dev.goago.cn
  DNS-style bucket+hostname:port template for accessing a bucket: %(bucket)s.cephcloud.dev.goago.cn bucket
  Encryption password: 123456
  Path to GPG program: /usr/bin/gpg
  Use HTTPS protocol: False
  HTTP Proxy server name:
  HTTP Proxy server port: 0