容器化的环境下,公司内部使用的镜像不可能直接放在 dockerhub 上,更不可能只放在某台机器上,所以一个公司内部的私有的 docker 镜像仓库(registry)必须存在。
目前来讲,docker registry 的实现还蛮多,包括官方的 registry、harbor,以及 nexus 等。
本文会讲 nexus 和 harbor 的使用,为什么要使用两个而不是其中一个呢?因为它们都有缺陷,两者合一用起来才完美。
harbor 的优势很明显,特别是可以自建文件夹进行分组这点就非常好。其实说实话,作为一个私有的镜像仓库,harbor 已经做得很好的了,唯一的缺点是它无法帮你下载镜像。
也可能并不是缺点,只是定位不同,而在这一点上 nexus 就很好的做到了,但是 nexus 除了这点外,其他好像没什么值得称道的地方了。
为什么需要 Registry 帮你下载镜像呢?因为在 kubernetes 环境下,你肯定有去公网拉镜像的需求,无论是官方还是非官方。你不可能因为这个而特地给你的所有 node 节点开通外网访问吧,这样风险太多且不可控。在我看来,整个 kubernetes 集群都不能访问外网。
这时 nexus 就有了用武之地了,当你需要拉公网镜像的时候,你只要向它发起请求,它如果本地没有,就会自动去你配置的镜像仓库下载,下载完成之后先在本地缓存一份,然后发送给你。
你甚至不用给 nexus 开通外网,只需要在一台可以访问外网的机器上搭建一个代理服务就行,让 nexus 通过代理去下载。那这方面的内容,我之前的文章中已经给出了解决方法,欢迎查看。
好了,关于 nexus 和 harbor 对比的简单说明就这么多了。那么本文的目标就是搭建 nexus 和 harbor,并使用免费可靠的 https 证书来开启 https。
nexus
nexus 最初是给 java 用的,后来慢慢发展,可以作为众多软件的仓库,比如 pipy、yum 等,在 3.0 版本中更是加入了 docker registry 的支持,因此我们要使用的至少是 3.0 版。
nexus 提供了 web 界面,默认监听 8081 端口,我们几乎所有的操作都可以在 web 界面上完成。当 docker 连接 nexus 时,默认通过 https,但是这只是针对 docker 仓库的端口(需要配置),而不是针对 web 界面。
也就是说,docker 并不会连接 web 界面所监听的 8081 端口,因此我们无需对 web 界面进行 https 配置。但是话又说回来,反正都要配 https 了,那将 web 界面进行 https 也只是顺手的事。
说了这么多,我们正式开始搭建。nexus 版本从 3 开始才支持 docker registry,这点需要注意,我们就直接下载最新版就好了。你可以直接访问官方文档来全面了解它。
安装
nexus 支持 docker 部署,我们这里就不用了,直接使用一台 Linux(CentOS7)搞起。
首先需要安装 jdk,官方说不支持 openjdk,只支持 oracle jdk。那么直接去 oracle 官网下载最新版的 rpm 包,放到服务器上使用 rpm -ivh 进行安装即可:
curl -v -j -k -L -H "Cookie: oraclelicense=accept-securebackup-cookie" https://download.oracle.com/otn-pub/java/jdk/8u201-b09/42970487e3af4f5aa5bca3f542482c60/jdk-8u201-linux-x64.rpm >jdk-8u201-linux-x64.rpm
rpm -ivh jdk-8u201-linux-x64.rpm
下载 jdk 完成后会出
* Connection #0 to host download.oracle.com left intact接着下载并解压 nexus:
cd /opt
wget http://download.sonatype.com/nexus/3/nexus-3.15.2-01-unix.tar.gz
tar xf nexus-3.15.2-01-unix.tar.gz
ln -s nexus-3.15.2-01/ nexus
当我们使用 root 用户启动时,虽然也能成功启动,但是它会抛出警告信息:
# cd nexus/bin
# ./nexus start
WARNING: ************************************************************
WARNING: Detected execution as "root" user.  This is NOT recommended!
WARNING: ************************************************************
Starting nexus
因此我们需要创建一个普通用户来启动它:
# ./nexus stop
# groupadd -g 1111 nexus
# useradd -u 1111 -g 1111 nexus
# chown -R nexus. /opt/sonatype-work/
# su - nexus
$ /opt/nexus/bin/nexus start
可以验证下它是否启动成功:
$ ss -tnl | grep 8081
LISTEN     0      50           *:8081                     *:*
简单配置
我们可以在 /opt/nexus/bin 下面看到一个 nexus.vmoptions 的配置文件,通过这个配置文件可以直接 jvm 参数。
$ cat nexus.vmoptions
-Xms1200M
-Xmx1200M
-XX:MaxDirectMemorySize=2G
-XX:+UnlockDiagnosticVMOptions
-XX:+UnsyncloadClass
-XX:+LogVMOutput
-XX:LogFile=../sonatype-work/nexus3/log/jvm.log
-XX:-OmitStackTraceInFastThrow
-Djava.net.preferIPv4Stack=true
-Dkaraf.home=.
-Dkaraf.base=.
-Dkaraf.etc=etc/karaf
-Djava.util.logging.config.file=etc/karaf/java.util.logging.properties
-Dkaraf.data=../sonatype-work/nexus3
-Djava.io.tmpdir=../sonatype-work/nexus3/tmp
-Dkaraf.startLocalConsole=false
这里的相对路径是相对于 nexus 本身,而非 nexus/bin。我们可以看到它会自动在 nexus 目录的父目录下生成 sonatype-work 目录,用来放配置文件、数据,还有日志等,你可以通过修改配置文件来改变它的位置。
前面使用 root 用户启动之后生成的这个目录的权限是 root,再使用普通用户启动的话,普通用户会因为没有权限往里面的日志文件中写数据而导致启动失败,所以只是上面要修改这个目录权限的原因。
配置 https
此时你可以直接使用浏览器访问 http://ip:8081 来打开它的 web 界面了,之后我们所有的操作都会在 web 界面上进行。在配置之前,我们先将 https 配置上去。之所以使用 https,是因为 docker 访问 registry 默认就是使用 https,如果使用 http 也行,但是会增加很多操作。
nexus 使用 https 的方式有两种,一种是直接配置 nexus 使用 https,另一种就是前面使用 nginx 配置 https,然后反向代理到后端的 nexus,其中客户端和 nginx 之间使用 https,nginx 和 nexus 之间则使用 http。而不管是从易用性还是实用性的角度,我们都应该使用 nginx。
其实我们要使用 https 的地方在于 docker 和 registry 之间,而非 nexus 的 web 界面。docker 和 registry 之间通信会使用另外的端口,而且 pull 和 push 端口都不一样,这个下面会讲到。
但是既然都要配 https 了,我们将 web 访问也配上 https 也只是顺手的事,反正证书都是使用同一个,而且使用 https 逼格更高。
OK,我们先安装 nginx。
# cat >/etc/yum.repos.d/nginx.repo <<'EOF'
[nginx]
name=nginx repo
baseurl=http://nginx.org/packages/centos/7/$basearch/
gpgcheck=0
enabled=1
EOF
# yum install -y nginx
如果说你的服务器不能访问外网,可以参考网络资源,教你如何在能够上网的机器上搭建代理服务,让其他内网服务器通过它来上网。那如果说你连一台能够上网的机器都没有,那你也可以通过上面的 nginx URL 将 rpm 包下载下来安装即可,它没有任何依赖。
要使用 https 首先得有证书,这方面可以参考网络资源,很容易就能够获取到安全可靠的 https 证书。那我这里就使用文章中已经申请下来的 *.ntpstat.com 这个通配符证书,准备使用 registry.ntpstat.com 作为 nexus 的域名。
那直接开始修改 nginx 配置文件。
# vim /etc/nginx/nginx.conf
# 替换 http 上下文的内容
http {
    include       /etc/nginx/mime.types;
    default_type  application/octet-stream;

    log_format  main  '$remote_addr - $remote_user [$time_local] "$request" '
                      '$status $body_bytes_sent "$http_referer" '
                      '"$http_user_agent" "$http_x_forwarded_for"';

    access_log  /var/log/nginx/access.log  main;

    proxy_send_timeout 120;
    proxy_read_timeout 300;
    proxy_buffering    off;
    keepalive_timeout  5 5;
    tcp_nodelay        on;
    sendfile        on;
    #tcp_nopush     on;
    #gzip  on;

    include /etc/nginx/conf.d/*.conf;
}

# 添加 https 配置
# vim /etc/nginx/conf.d/ssl.conf
server {
    listen   *:443;
    server_name  registry.ntpstat.com;

    # 允许大文件上传
    client_max_body_size 1G;

    # 对大于 1G 文件的下载进行优化
    #proxy_max_temp_file_size 2G;

    ssl on;
    ssl_certificate      /etc/nginx/cert/fullchain.pem;
    ssl_certificate_key  /etc/nginx/cert/privkey.pem;

    location / {
        proxy_pass http://127.0.0.1:8081/;
        proxy_set_header Host $host;
        proxy_set_header X-Real-IP $remote_addr;
        proxy_set_header X-Forwarded-For $proxy_add_x_forwarded_for;
        proxy_set_header X-Forwarded-Proto "https";
    }
}
复制代码
检查配置文件没有问题之后,就可以启动 nginx 了:
# nginx -t
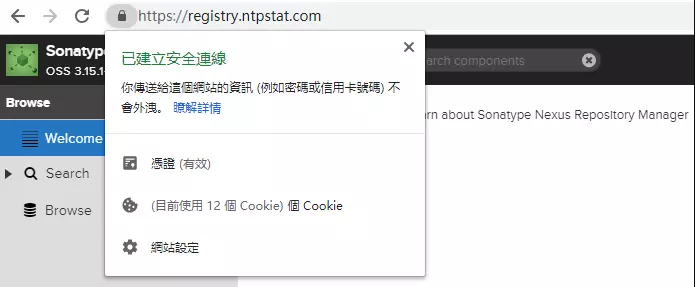
# systemctl start nginx接着在本地配置 hosts 文件,将 registry.ntpstat.com(换成你的域名)映射到服务器所在 ip,然后在浏览器中直接使用 https://registry.ntpstat.com(换成你的域名)进行访问。可以看到,https 配置成功。
配置 blob stores
web 页面配置 https 只是小试牛刀,主要还是为了证明证书没有问题,当然也是为了提升逼格。那么接下来就要配置 docker 仓库了,而这之前我们先配置仓库使用的存储,将不同的仓库的数据放在不同的目录下,方便管理。
首先,在 nexus 的 web 界面上点击右上角的 Sign in,使用默认 admin/admin123 进行登录,登录成功后,会出现一个小齿轮的图标,点击进去之后就可以进行配置了。
我们首先点击 Repository 下面的 Blob Stores,点击 create blob store 创建一个新的 blob store。
- Type:file
- Name:docker-hub
- Enable Soft Quota:限制目录大小,有兴趣可以勾选;
- Path:自动补全,无需理会。
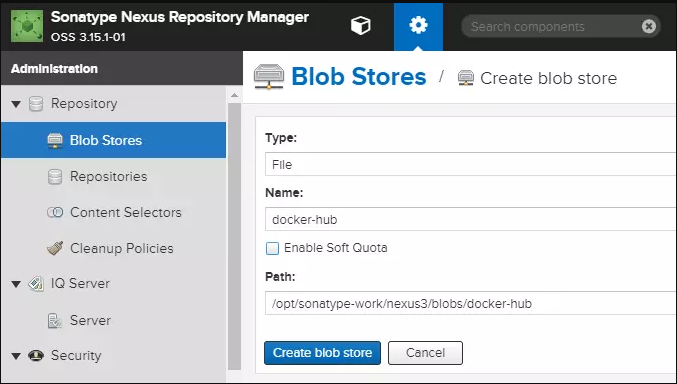
创建完成后,再创建一个:
- Type:file
- Name:docker-private
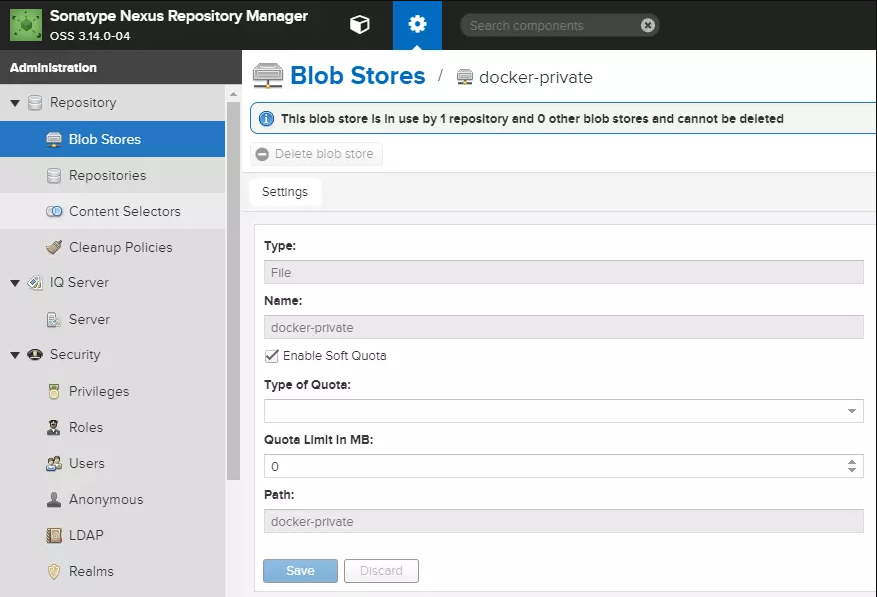
两个存储路径就建好了,一个是给外部镜像使用的,另一个给公司内部镜像使用的。但是基本上公司内部的镜像会放在 harbor 中,因为更好分类。
配置内部 docker 仓库
同样是设置界面,我们选择 Blob Stores 的下一个选项 Repositories,我们会在其下配置 docker 的镜像仓库。
Name:docker-private;Online:勾选;HTTP:勾选,并输入 8083 端口(这个端口随意,后面对上就行);HTTPS:不要管,https 我们会在 nginx 上面配;Allow anonymous docker pull:看需要了,如果你想拉镜像的时候不需要登录就勾选,我不勾选;Enable Docker V1 API:如果你使用的 docker 版本够新的话,可以不勾选,我勾了;Blob store:选择之前创建的 docker-private;Strlct Content Type Validation:貌似是要验证 push 的镜像的格式,我勾了;Deployment policy:是否允许部署和更新镜像啥的,没弄懂,我选了 Allow redeploy;Available cleanup policles:镜像的清除策略,因为我们还没创建,因此没得选,就先不选吧;
这个 repository 就是用来放公司内部的镜像,在我们的计划中它其实用不到,因为可以用 harbor 来完成,但是难免有人会用到,因此一并创建了。下次再创建一个 repository,这个仓库用来存放从 dockerhub 下载下来的官方镜像。
Create repository -> docker(proxy):
Name:docker-hub;Online:勾选;remote storage:https://registry-1.docker.io,这是 dockerhub 的地址;Docker Index:Use Docker Hub;Auto blocking enabled:勾选;Maximum component age:缓存时间自己定就好,默认 1440 为一天;Maximum metadata age:使用默认值即可;Blob store:选择之前创建的 docker-hub;Not found cache enabled:镜像没有找到是否缓存,默认缓存,按默认来;Not found cache TTL:缓存时长使用默认值即可;
没有提到的选项不用管,然后就创建完毕了。使用它可以从 docker hub 上下载镜像了,下载的方式下面会讲到。它应该还可以配置从 k8s.gcr.io 下载,这里的镜像是 docker hub 中没有的,有兴趣的可以试试。
接下来还得创建一个 repository,这个仓库用来分组,将上面两个仓库合并在一起,通过都一个端口来同时访问它们。
Create repository -> docker(group):
Name:docker-group;
Online:勾选;
HTTP:8082;
Allow anonymous docker pull:我没有勾选,需要认证才能下载镜像;
Enable Docker V1 API:如果你使用的 docker 版本够新的话,可以不勾选,我勾了;
Blob store:它只是一个组,不存放任何东西,因此使用 default 即可;
Member repositories:将 docker-private 和 docker-hub 放到右边;

创建完毕之后,nexus 会自动启动 8082 和 8083 端口。其中 8082 是用来 pull 私有仓库和 dockerhub 镜像的,8083 用来 push 镜像到私有仓库。现在要做的就是使用 nginx 为这些端口配置 https。
我们分别通过 2222 和 3333 端口来代理 8082 和 8083,并且在 2222 和 3333 上启用 https,因此 docker 需要连接 2222 和 3333 端口。
# vim /etc/nginx/conf.d/nexus.conf
server {
listen 2222 ssl;
server_name registry.ntpstat.com;
ssl_certificate /etc/nginx/cert/fullchain.pem;
ssl_certificate_key /etc/nginx/cert/privkey.pem;
ssl_session_cache shared:SSL:50m;
location / {
proxy_set_header Host $host:$server_port;
proxy_set_header X-Real-IP $remote_addr;
proxy_set_header X-Forwarded-For $proxy_add_x_forwarded_for;
proxy_set_header X-Forwarded-Proto $scheme;
proxy_redirect http:// https://;
proxy_pass http://127.0.0.1:8082;
client_max_body_size 1024m;
client_body_buffer_size 128k;
}
}
server {
listen 3333 ssl;
server_name registry.ntpstat.com;
ssl_certificate /etc/nginx/cert/fullchain.pem;
ssl_certificate_key /etc/nginx/cert/privkey.pem;
ssl_session_cache shared:SSL:50m;
location / {
proxy_set_header Host $host:$server_port;
proxy_set_header X-Real-IP $remote_addr;
proxy_set_header X-Forwarded-For $proxy_add_x_forwarded_for;
proxy_set_header X-Forwarded-Proto $scheme;
proxy_redirect http:// https://;
proxy_pass http://127.0.0.1:8083;
client_max_body_size 1024m;
client_body_buffer_size 128k;
}
}
验证是否配置成功
配置完成之后就可以使用 docker login 命令验证了。在此之前,如果你系统上配置的 dns 无法解析 registry.ntpstat.com(替换成你的),你还需要将之添加到 hosts 文件中。这里略过,直接验证。
# docker login -u admin -p admin123 registry.ntpstat.com:2222
# docker login -u admin -p admin123 registry.ntpstat.com:3333
只要出现 Login Succeeded 表示验证 ok,没出现自然就是失败了。
如果验证失败,你可以在 /etc/docker/daemon.json 中下面这行,IP 换成 nexus 的 ip 或主机名都可以。
"insecure-registries" : ["IP:8082", "IP:8083"]文件修改完毕之后,使用 python -mjson.tool </etc/docker/daemon.json 来验证格式是否正确,然后重启 docker。
这是使用 http 而非 https 的方式直接连接 nexus,如果验证成功,那就是你 nginx 配置有问题。当然证书肯定没有问题,不然你 https 访问 web 界面就一定不会是安全的。如果验证失败,那就是配置有问题了,照着上面仔细再配一遍吧。
# docker login -u admin -p admin123 IP:8082
# docker login -u admin -p admin123 IP:8083
如果你使用 ip 的方式登录成功了,但是使用 https 死活都登录不了,且 nginx 配置不存在问题的情况下,可能是你 docker 使用了代理,docker login 的请求转发到代理服务器上去了。
此时你要检查 docker systemd service 文件以及同一目录下的 docker.service.d 目录下的所有文件,看看这些文件中是否存在 HTTP_PROXY 这样的配置,如果有,注释后重启 docker 再验证。
这种情况可以通过抓包发现。
下载 dockerhub 镜像版权声明:本文遵循 CC 4.0 BY-SA 版权协议,若要转载请务必附上原文出处链接及本声明,谢谢合作!
验证成功之后就可以下载镜像了,nexus 可以帮我们从 dockerhub 上面下载镜像,前提是你的 nexus 能够访问 dockerhub。如果不能也不要紧,搭建一个代理服务吧。那如果说你连可以上网的机器都没有,那就没办法了,你可以直接使用 harbor 了。
nexus 配置代理的方法也很简单,管理员登录 -> 点击小齿轮图标 -> System -> HTTP -> 勾选 HTTP proxy -> 添加主机和端口 -> Save。
这样一来,你 nexus 所有的 http/https 请求都会通过这个代理进行。当然,如果有不需要代理的 ip 你可以填在 Hosts to exclude from HTTP/HTTPS proxy 中。
现在你的 nexus 能上网了,那么先下载个 busybox 镜像吧。前面提到过,镜像下载使用 2222 端口。
# docker login -u admin registry.ntpstat.com:2222
# docker pull registry.ntpstat.com:2222/busybox
Using default tag: latest
latest: Pulling from busybox
697743189b6d: Pull complete
Digest: sha256:4415a904b1aca178c2450fd54928ab362825e863c0ad5452fd020e92f7a6a47e
Status: Downloaded newer image for registry.ntpstat.com:2222/busybox:latest
如果你允许匿名 pull 就不需要登录。
只需要将镜像名写在 registry.ntpstat.com:2222/ 的后面即可,nexus 本地如果没有,就会去 dockerhub 上下载。当然,这么下载下来的镜像名自然也就是很长的一串了。
上传镜像
上传镜像使用 3333 端口,我们将刚刚下载下来的镜像上传。
# docker login -u admin registry.ntpstat.com:3333
# docker tag registry.ntpstat.com:2222/busybox registry.ntpstat.com:3333/busybox:test
# docker push registry.ntpstat.com:3333/busybox:test
The push refers to repository [registry.ntpstat.com:3333/busybox]
adab5d09ba79: Pushed
test: digest: sha256:4415a904b1aca178c2450fd54928ab362825e863c0ad5452fd020e92f7a6a47e size: 527
push 必须登录。我这里给 busybox 加了个 tag,只是为了测试,没有任何作用。那么关于 nexus 作为 docker 仓库的内容也就这么多了,接下来配置 harbor。
harbor
在安装使用 harbor 之前,如果你的 harbor 和 nexus 都安装在同一台服务器上,你需要将代理 nexus 的 nginx 的 80 和 443 端口改掉,因为 harbor 会监听这两个端口。其实这样一来的话,nginx 的 80 和 443 都可以不用了,直接使用 nexus 的 8081 访问即可。
安装
harbor 是 VMware 开源的 registry,也是一款大众熟知的产品,它的 GitHub 地址在此。它的安装只能通过 docker 进行,因此你得首先安装 docker。
# yum install -y yum-utils device-mapper-persistent-data lvm2
# cat > /etc/yum.repos.d/docker-ce.repo <<'EOF'
[docker-ce-stable]
name=Docker CE Stable - $basearch
baseurl=https://mirrors.aliyun.com/docker-ce/linux/centos/7/$basearch/stable
enabled=1
gpgcheck=1
gpgkey=https://mirrors.aliyun.com/docker-ce/linux/centos/gpg
EOF
# yum install docker-ce
# systemctl enable docker
# systemctl start docker
# systemctl status docker
你还得安装 docker-compose,它用来定义和管理由多个容器构成的应用。很显然,harbor 需要运行多个容器。
curl -L "https://github.com/docker/compose/releases/download/1.23.2/docker-compose-$(uname -s)-$(uname -m)" -o /usr/local/bin/docker-compose
chmod +x /usr/local/bin/docker-compose
docker-compose --version
以上前置条件都完成之后,下载 harbor 的离线包:
wget https://storage.googleapis.com/harbor-releases/release-1.7.0/harbor-offline-installer-v1.7.1.tgz貌似被墙了,可以通过国内镜像下载,但是从我写这篇文章时发现国内镜像的最新版本才 1.5 而非 1.7。这次操作还是通过 1.7 进行,1.5 应该和 1.7 安装起来应该没啥区别。当然,作为一名技术人,基础的**墙手段应该还是应该具备的。
下载完成后先解压:
tar xf harbor-offline-installer-v1.7.1.tgz
mv harbor /opt
cd harbor
配置并启动
在修改配置文件前,我们需要首先获得 https 证书,https 证书咱们已经获取了,这里就不多提了。我们先看看它的 compose 配置,它定义了 harbor 所需所有镜像的配置。
vim docker-compose.yml可以看到它将数据都保存在 /data 目录下,如果你想要改的话,可以使用 sed 直接替换。我这里将其改为了 /opt/data:
# 先查看改的对不对
sed -n 's@- /data/@- /opt/data/@gp' docker-compose.yml

# 确认 ok 之后,开干
sed -i 's@- /data/@- /opt/data/@g' docker-compose.yml

# 将目录创建出来
mkdir /opt/data
从 yml 文件我们还可以看到,它的 https 以及 web 服务器都是配置在 nginx 容器中的,且它是将 harbor/common/config/nginx 下面的所有文件都作为 nginx 容器的配置文件。这个目录目前并不存在,执行 prepare 脚本会创建。
其他的有想改的可以动手改,这里就不改了。接着修改配置文件。
# vim harbor.cfg

hostname = registry.ntpstat.com
# 直接 https 搞起
ui_url_protocol = https
# 我们有证书,不需要生成
customize_crt = off
# 指定证书文件
ssl_cert = /etc/nginx/cert/fullchain.pem
ssl_cert_key = /etc/nginx/cert/privkey.pem
# 因为我这里改了它的存储目录,所以这里也要改
secretkey_path = /opt/data
# 管理员密码
harbor_admin_password = Harbor12345
还有其他的配置,比如邮件以及 ldap 的,有兴趣的可以修改,这里就略过了。
修改完成之后,执行 prepare 脚本:
# ./prepare
Generated and saved secret to file: /opt/data/secretkey
Generated configuration file: ./common/config/nginx/nginx.conf
Generated configuration file: ./common/config/adminserver/env
Generated configuration file: ./common/config/core/env
Generated configuration file: ./common/config/registry/config.yml
Generated configuration file: ./common/config/db/env
Generated configuration file: ./common/config/jobservice/env
Generated configuration file: ./common/config/jobservice/config.yml
Generated configuration file: ./common/config/log/logrotate.conf
Generated configuration file: ./common/config/registryctl/env
Generated configuration file: ./common/config/core/app.conf
Copied configuration file: ./common/config/coreprivate_key.pem
Copied configuration file: ./common/config/registryroot.crt
The configuration files are ready, please use docker-compose to start the service.
可以看到,它生成了很多的配置文件,其中就有 nginx 的,它会将我们在配置文件中指定的证书复制到 common/config/nginx/cert/ 目录下,这样容器内的 nginx 就能够加载到了。你可以使用 md5sum 命令来检测两个证书文件是否一致。
然后就可以执行 install.sh 了,其实执行这个脚本的过程中它会自动执行上面执行的 prepare 脚本:
# sh install.sh
...
✔ ----Harbor has been installed and started successfully.----

Now you should be able to visit the admin portal at https://registry.ntpstat.com.
For more details, please visit https://github.com/goharbor/harbor .
这种安装方式不会安装 Notary/Clair,如果要安装它们,可以给 install.sh 传递 --with-notary 和 --with-clair 参数。
你如果还希望使用 harbor 作为 chart 仓库,为 helm 提供支持的话,可以给 install.sh 传递 --with-chartmuseum。
安装成功之后,会出现上面结尾的信息,然后浏览器直接访问就行了,我这里访问的是 https://registry.ntpstat.com,你们访问你们的。
然后就打开了 harbor 的 web 界面了,默认使用 admin/Harbor12345 直接登录。你可以直接创建不同的项目,也就是所谓的不同的目录,然后将不同的镜像放到不同的目录下,这样分类起来就很方便了,这也是 nexus 不具备的地方。
上传镜像
默认只有一个 library 项目,我们现在往里面上传
# docker login -u admin -p Harbor12345 registry.ntpstat.com
# docker tag registry.ntpstat.com:2222/busybox registry.ntpstat.com/library/busybox
# docker push registry.ntpstat.com/library/busybox
The push refers to repository [registry.ntpstat.com/library/busybox]
adab5d09ba79: Pushed
latest: digest: sha256:4415a904b1aca178c2450fd54928ab362825e863c0ad5452fd020e92f7a6a47e size: 527
push 完成后,就可以在 library 下面看到 busybox 这个镜像了。harbor 和 nexus 不同,它上传和下载镜像都使用同一个端口。
pull 镜像就很简单了,将上面的 push 换成 pull 就行了,而且只要项目的访问级别为公开,那么 pull 的时候都不用 login,这样在写脚本的时候会方便一点。当然,不公开也没啥关系,无非就多了个登录操作而已,在 k8s 中很容易做到。
停止和启动
我们之前执行 install.sh 的时候自动将 harbor 拉起来了,总不能每次重启都执行 install.sh 对吧。
它的停止和启动的方式如下:
docker-compose stop
docker-compose start
如果你想要改变 harbor 配置,你应该使用上面的命令先停止 harbor,然后修改 harbor.cfg,执行 prepare 生成新的配置,然后启动 harbor。整个过程如下:
# docker-compose down -v
# vim harbor.cfg
# prepare
# docker-compose up -d
好了,这篇文章就写到这里了,这只是个扫盲文章,更深入的东西就要靠你们自己研究了。